Thursday, March 29, 2012

Happy (Spring) Day!

Yay- Spring is here! That's reason enough to make a "Happy Day" card, right?
Today I am sharing with you a card I made using a wonderful stamp set from My Cute Stampscalled "Ashley's Blossoms". It's a real favorite of mine, and think you'll agree that it's not only super cute, but a very versatile set.


This set could easily be used for so many occasions: birthday, thank you, anniversary, Mother's Day, thinking of you, miss you, get well, sympathy... you get the picture ;-)

It's funny- this is one of the rare times I only used paper- no ribbon or bling! But with all the texture from the Cuttlebug Birds & Swirls embossing folder, and the Spellbinders circle diesand Martha Stewart lace doily edge punch- along with the colors and popped up bird, I didn't really need to add anything more. And with a bunch of EK Success 3D-Dots, there is a lot of added dimension as well.


The Ashley's Blossom set- and all "My Cute Stamps" are on sale for just a couple of more days (the sale ends March 31st!) so you'd better hurry on over to the store quick ;-)

I am also entering this card into the following challenges:
Creative Card Crew: #7: Spring
Simon Says Stamp Challenge Blog: Anything Goes

I wish you a "happy day" and as always, Blessings~
Sarah

Thursday, March 22, 2012

Sew Special Birthday Card


I love Crafty Secrets... and am so excited because the sale has started at the ABC store! Now you can get Crafty Secrets- and My Cute Stamps for 20% off! I just recently got the Crafty Secrets Sew Special stamp set and just love it! I had so much fun making this card and would like to share it with you today:

I have several friends who sew, and I have been wanting to make birthday cards themed just for them. When I saw the set I just knew that would be the perfect one to use. I think it will really be fun to make variations of this card.

I started out with some SU! Early Espresso and Cajun Craze card stock onto which I added a beautiful patterned piece from the Graphic 45 Steampunk Debutante collection. I distressed the edges well and inked the sides with some Tim Holtz Vintage Photo distress ink. The Ranger blending tool works great for this.

Then I stamped the mannequin stamp onto some water color paper and water colored it with SU! Watercolor Wonder crayons. I stamped it again onto a piece of Authentique patterned paper from (believe it or not) the Christmas paper pad, "Wonder". Then I cut out just the bustier part of the image and paper pieced it onto the mannequin. I love how it came out! So, I worked the rest of the card around that wonderful image.

I used the same technique as I did on my card from last week (here) where I pleated the lace around my die cut Spellbinders shape. This time it is a scalloped oval, embossed using the Cuttlebug Swiss Dots embossing folder. I added several vintage buttons all around the inside of it. The gathered lace behind it is some vintage trim I had in my stash. I was going to use one of the awesome sentiments from the set, but just decided to make it a birthday card for one of my friends. But I know I'll use those other sentiment stamps soon; they are adorable!
I used Versamark ink and gold embossing powder with the SU! stamp from the Four Frames set. Then I punched it out with the label punch. My happy birthday sentiment is from the SU! Teeny Tiny Wishes stamp set.


I hope you'll check out all the wonderful Crafty Secrets- and My Cute Stamps- items that are on sale now and take advantage of the great prices. I just LOVE my new Sew Special set and can hardly wait to make another card with it!

Don't forget- you still have time to get your entry in for our"Springtime Theme" challenge with a chance to win up to $25.00 in store credit!

I am also entering this card into the following challenges:
CCCB Challenge #2: Ribbon and/or lace
Shopping Our Stash challenge 44: Buttons and/or Bows
Cute Card Thursday: Anything Goes

Thanks for stopping by today. I hope you will leave me a comment, as I always love hearing from you :-) I hope you are having a happy start to Spring, and as always, I wish you blessings~
Sarah


Thursday, March 15, 2012

Scrap Your Crap Challenge: Tape!

It's finally time for me to share my very first project as a designer for Scrap Your Crap!
I am so excited to be among all the wonderful design team members on this super fun blog!
I hope you will check out the SYC blog and play along with us on the awesome challenges we will have for you.

This month's challenge is to use Deco tape- also known as masking or washi tape on your project.
I decided to use some Tim Holtz tissue tape that I have had sitting on a shelf for over a year. I had never even tried any type of this tape before, so it was great to finally bust that package open!

I created a 12x12 scrapbook page using a photo of my maternal grandmother. This picture was taken when she was a teenager, around 1908. I was extremely close to my grandmother, and I just love this picture of her.


I used the tissue tape on the bird cage. First I die cut some Tim Holtz grungeboard using the bird cage die. Then I adhered several strips of the tissue tape to a piece of card sock. When it was good and dry, I die cut that using the bird cage die. I adhered the tissue taped die cut to the grunge board bird cage. I added some antique mother of pearl buttons on the bottom and wove some gold leaf ribbon through it. I just love how it came out!
I can tell you this much: I plan on using a lot more tissue tape on future projects, now that I know how fun it is to use and how awesome the results can be!

For this page I also wanted to add a lot more fun and feminine elements; things that either reminded me of my grandmother or things I think she would have enjoyed herself.

I'd love to share some of my memories of this very special woman whom I called "Dee-dee". She was a wonderful seamstress, artist and designer. She made many of her own clothes and hats, and I remember her so often either making argyle socks for my Dad or my Uncle, or mending something for someone. Her knitting bag was always close by! She not only made me Barbie doll clothes out of scrap pieces of material, but she even made me a wedding dress for my doll from lace that was used on her own wedding dress. I remember when I was a little girl sitting snuggled right up beside her in an easy chair as she taught me how to sew by hand. But I can't imagine ever being as accomplished a seamstress as she!
She also drew and painted, and I have (and treasure!) some of the paper dolls she made when she was about 10 years old. She also designed furniture and jewelry. I have a brooch she designed which my grandfather had made from her drawing and surprised her with. I also have a lovely mahogany cabinet she designed which her father had made by a well known New England furniture maker. Her talents did not stop there, though. She was a concert pianist and among my favorite childhood memories are of hearing her play the piano. Claire de Lune was one of songs she'd often play. But she also loved The Beatles and would play Here Comes The Sun, too :-) And what a cook and baker she was! I have never tasted better home made bread or chicken fricassee anywhere!

So back to my page and some of the things I chose to use on it:

I picked these flowers not only to add a little color, but because they are so feminine and colors I actually remember Dee-dee wearing. I even recall a pair of satin high heeled shoes she had that were that pale and dusty shade of rose, and had a big flower right on the top. I used to slip them on when visiting her and playing "dress-up". And she so often wore pearls that I just had to get a couple of them in somewhere ;-)

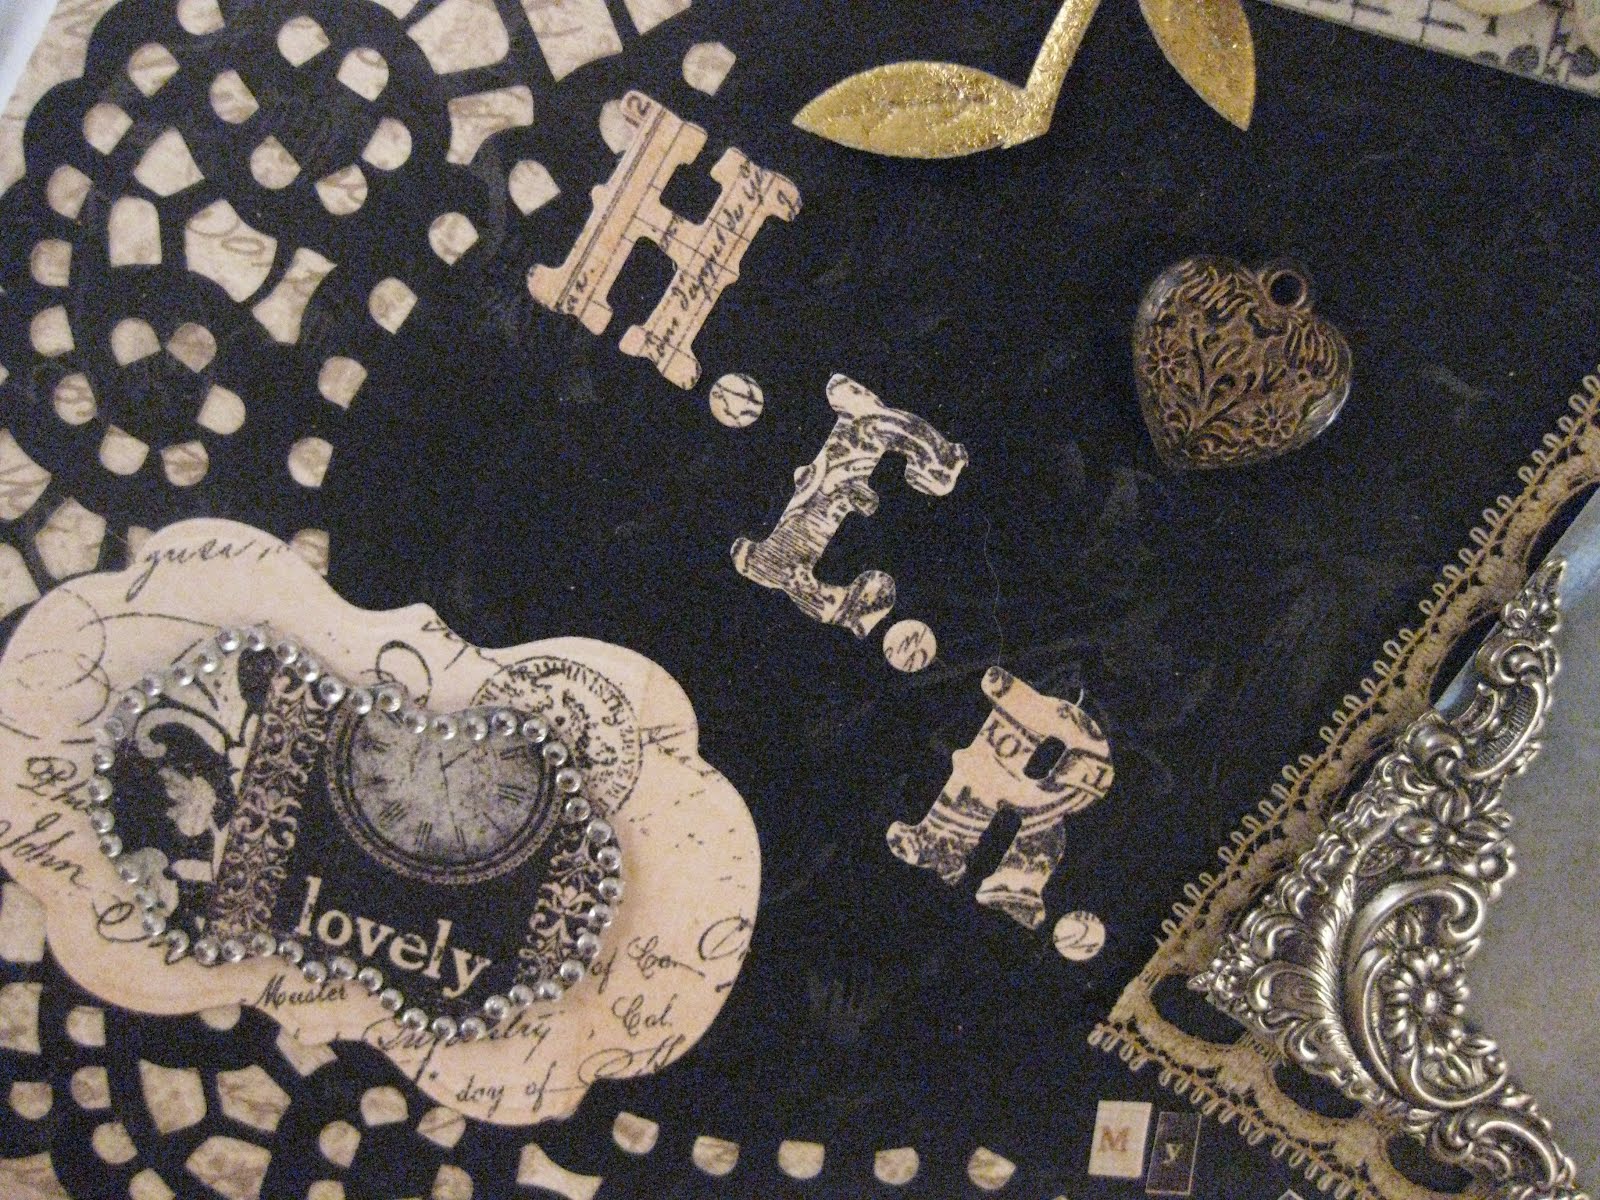
Her initials were H.E.R., and I think the paper patterns I used are perfect for such a vintage kind of page.

My grandmother loved birds and so the bird, cage, and this little nest with eggs were wonderful additions. There were many other things I wanted to add, but could only fit so much. But I had so much fun making this and since I have many more photos of her, this is only the beginning!

Thanks so much for stopping by. I hope you have enjoyed all that I have shared with you today and that you may have been reminded of a special person- your own grandmother, maybe?- who has left you with as many wonderful memories as my grandmother left me.

I have also entered this page into the following challenges:
Creative Card Crew challenge: "Vintage"
Let's Ink It Up challenge #21: Show Us Your Flowers

As always, I'd love to hear from you; your comments make my day!

Wishing you Blessings~
Sarah

Spring Bluebird

We set our clocks ahead, and although it may have been an unwelcome adjustment, it is a sign of Spring, right? And we all love those, don't we? :-) Well, I recently read a sentence stating that "bluebirds are a sign of Spring". That was enough for me to pull out one of my favorite Crafty Secrets stamp sets, Bird Lovers. One of the cute little bird images is what inspired me to make this card:

I began by water coloring this little bird and cutting him out. I used 3D Dots to adhere him to the Authentique Journey patterned paper. I cut it using a Spellbinder's Classic Circle die, and under it I placed a scalloped die cut circle. Around the edges I just added some lace trim from my stash.

After that came the fun of figuring out what to do with my little bird piece. I chose a coordinating pattern from the Authentique Journey pad and used that as my main paper. I love this pad- all the patterns are so pretty (with lots of blue) and compliment one another well.
Adding a nice sentiment (I chose scripture) and some embellishments made it all come together easily. I used the Spellbinders Classic and Scalloped rectangle dies which matched the circle dies, and the Prima flowers seemed like the perfect added touch. I particularly love the natural color ones, as they are great just as they are or you can easily die/color them in whatever color you want to match your project. I just added a few pearls to the centers.
Finally, a piece of satin ribbon from my stash and a hand made stick pin went onto the card and it was done.

Finally, a piece of satin ribbon from my stash and a hand made stick pin went onto the card and it was done.

I am also entering this card into the following challenges:
ODBD100 Aqua or Topaz plus Scripture challenge over at Our Daily Bread Designs in honor of their 4th anniversary. You can check out the challenge HERE. The wonderful Scripture I chose for my card is from the Design Team Scripture 3 stamp set.

DDCC challenge blog for their challenge #156: Dots & Stripes.

Really Reasonable Ribbon RRR44 Spring with ribbon theme

CCEE1212: Focusing On The Sentiment

Thanks so much for stopping by today.
I wish you blessings, and hope you happen to see some bluebirds where you live, as being a sign of Spring I am sure they will make you smile!


Thursday, March 8, 2012

ABC Springtime Card: Hoppin' Down The Bunny Trail

Hi Everyone! I hope you are having a wonderful Thursday!
Today I have an Easter card to share with you that I made for ABC Toys & Crafts. Actually, two cards ;-) It started out as one, but I had such fun with it, that I ended up making it in another color as well, and I'll show you both:


I love the cute little Martha Stewart punches for Easter. The bunny is just adorable! But I have to admit, I just can not get the "Here comes Peter Cottontail...." song out of my head when I see it, lol! Anyway, I thought he would fit perfectly among the punched out Martha Stewart tulips, so I made a row of them and stuck him in there. And then I had an idea.... to make him fuzzy! :-) All I did was punch him out in some tan card stock and put light brown fun flock on him. Then, I added a little dot of white for his tail. Cute, huh?

My sentiment was stamped and layered onto card stock that I cut using the Spellbinder's classic and scalloped oval dies. I can not tell you how often I used these! They are wonderful and work perfectly on so many projects. And, ALL SPELLBINDER'S DIES are now on sale at 20% off- no coupon required- so make sure to check them out HERE!


I love the pattern paper from Crafty Secret's. This was from the Classic paper pad. It made a perfect Spring background for Peter and the tulips. I cut it into the cute scalloped shape using the Sizzix Scalloped Card die.


So then I went on to make the same card in pink. I just changed the sentiment and moved it over to the side.

Well there you have it: a couple of quick and easy Easter/ Spring cards.
I hope I have inspired you to make some Spring cards of your own. Easter is exactly one month from today, and will be here before we know it.

Thanks for stopping by.
Wishing you Springtime Blessings,
Sarah

Sunday, March 4, 2012

ABC Challenge Time!

Hello and Happy Sunday!
It's an absolutely gorgeous day here with bright sunshine and temps expected to be in the low 80's. Okay- maybe that's more like Summer weather than Spring, but seeing that it is only early March, it sure does make me feel as if Spring is here!

Our challenge for you over at the ABC Toys & Crafts Challenge Blog is to
create a card or project with a Springtime theme.
Here is the card I came up with in I hopes that it will jump start your inspiration:

I started out using a base card of SU! So Saffron card stock onto which I stamped SU!'s Weathered background stamp. Then I took a piece of Crafty Secret's patterned paper from the Pastel paper pack and distressed the edges. Before adhering it to the card base, I wrapped some SU! Certainly Celery satin ribbon and some unknown crocheted lace from my stash around it.

I inked up this beautiful Hero Arts stamp called "Jamaican Forget Me Not" using SU! markers in So saffron, Rose Red and Always Artichoke, and stamped the image onto Confetti Cream card stock which I die cut with a Nestabilities Labels Six die.

I stamped the sentiment from SU!'s Easter Blossoms stamp set in Always Artichoke ink onto a piece of Certainly Celery card stock which was die cut using one of the Nestabilities Scalloped Ovals dies.

Then I just punched out a few little butterflies using the Martha Stewart butterfly punch, and glittered them up a bit with SU! Dazzling Diamonds. I added my favorite little Hero Arts 3mm pink pearls on them and to a couple of the card's corners and the card was done.

I hope I have inspired you to make a Springtime themed card or project of your own!
Remember- the winner will receive a $20.00 store credit and an extra $5.00 for displaying our blinkie for a total of $25.00!!!
Please check out the ABC Toys & Crafts Challenge Blog for all the details.Thanks so much for stopping by today. I hope you can feel Spring coming too, and will share your creation with us!!
Wishing You Blessings,
Sarah

Thursday, March 1, 2012

ABC Spring Birthday Wishes

It's time again for me to share another card I designed for ABC Toys & Crafts!

Are you feeling like me and totally ready for Spring? :-)
I have a friend who has a birthday coming up the end of this month, so given that Spring technically does begin right around her birthday, I figured what better reason to make a pretty Spring like card?

This is another one of my more simple designs. I love how these gorgeous Crafty Secrets papers from the Pastels paper pad make it so easy to create projects around their beautiful patterns. When matched with this awesome Martha Stewart Deep Edge Garden Trellis Border punch, all that was left to do was to add a sentiment and put on a couple of embellishments. The sentiment is from the Crafty Secrets clear stamp set Card Sentiments. I stamped it onto a Spellbinders Classic Ovals die cut and layered it over another oval and just added some pearls around it.

That's it! Another quick and easy card, but one I think my sweet friend is going to love. The colors are so pretty and just what I think she'll enjoy arriving in her mailbox on the East Coast after months of Winter weather :-)

Thanks for stopping by today!
Wishing you blessings~
Sarah