Saturday, August 27, 2011

When Is It A CASEd Card....

.... And when does it become an "inspired" card???

I would like to share with you a card I recently made that begs to ask this question. As you probably know, CASE stands for "copy and share with everyone". And I will admit, I have done my share of CASEing! I don't do nearly as much now as I used to, but I am certainly prone to CASEing when I find one of those cards that just screams "make me" to me!

And HERE is one of them! (Please see July 28, 2011 post "Button Buddies".) I fell in love with this card as soon as I saw it. (BTW- Joanne's entire blog is filled with wonderful cards). But, as it turns out, she "CASEd" her darling card from THIS one made by Jennie. (She also has an amazing blog filled with awesome cards!)

Well, I ended up CASEing them, and here is what I came up with:


So... I'd love to know: Is this (and is Joanne's) what would be considered a CASE? I have heard that to CASE, you really do have to "copy". But when you change at least 3 elements of it, it is then not an actual copy and is known as an "inspired" card.

Okay, so I changed:
1) The shape of the card to scalloped
2) I embossed it with the dots embossing folder
3) Omitted the clip and tied ribbon around the card vertically.

But to me, it certainly feels like I copied it, as it so closely resembles both Joanne's and Jennie's. And, I always like to give credit where credit is due (and both ladies graciously allowed me to link to their cards here).

So.... I would LOVE to hear from you as to what you think. When is a card a CASE and when do you consider a card one that you were "inspired" to make? And, do you put your name on your cards if you haven't totally designed them yourself? I think this could be a very interesting subject to have others weigh in on. Please leave a comment, if you would!

Thanks so much to both Joanne and Jennie for their wonderful cards and for letting me share them!

Here are some close-up details of the one I made, and some others I made in different colors


Thanks so much for stopping by. I would really love to hear what you think about the topic of CASEing! I'll be back soon with some little cards I cased from the new Stampin' Up! idea book and catalog. Until then, happy stampin'!

Items I used for these cards:
Stamps: All SU!: Snail image from Button Buddies set. "Happy Birthday" stamp from Vintage Labels set. "A Little Late" stamp from "On Your Birthday" set.
Ink: Jet Black Archival Ink; SU! inks: Old Olive; Pumpkin Pie; Chocolate Chip
SU! card stock (for bases) in: Regal Rose, Pacific Pointe, Tempting Turquoise, Daffodil Delight and Riding Hood Red. Also, PTI white and SU! Very Vanilla for stamped layer and SU! Black for layer underneath.
Card stock for tags: SU! Pink Pirouette, Very Vanilla, Pumpkin Pie, and Papertreyink White
Ribbon: SU! Wide striped grosgrain in Old Olive, Pumpkin Pie, Riding Hood Red, Chocolate Chip and Black
SU! White Baker's Twine; PTI Linen thread
Buttons: Various colors of vintage buttons from PTI
Embossing folder: Sizzix polka dots from SU!
Card shape cut using Sizzix Bigz XL die scallop card #3
Other: SU! scallop edge border punch; Sizzix scallop tag combo die


Monday, August 1, 2011

Photo Shoot At The Beach


So here's the 2nd of the two scrapbook pages I recently made. The picture I used was taken the same day as the other one, but this one was shot by my oldest daughter who is a professional photographer. She had taken my husband and me to Laguna Beach to take pictures of us. She ended up putting them into a beautiful book in which all four of our children wrote the most wonderful messages throughout the pages, and they gave the book to us for Christmas. It was an amazingly wonderful gift which we will cherish always!
Anyway... back to the photo shoot: After we were finished having our pictures taken, she took a few shots with our youngest daughter in them, too. I just love this one!


For this page, I again used K&Company stitched paper from that same kit. I thought the colors in this were great with the photograph. And I found some Webster's Pages ribbon that really picked up the green that was on the page as well as in the photo.


I used SU!'s flower punch to punch out a stamped flower and simply wrote in it for my title.


A few SU! buttons and some Papertreyink twine were added on the top right corner of my photograph as a simple embellishment.


And another one of those cute bee dimensional stickers from K&Company to adorn the flower on the page.


And finally, I adhered some tiny, real sea shells with glue dots to the page. I did this little cluster and then a few shells spread about the page as well.

It was great being able to get a couple of pages done so quickly! Keeping in mind that I don't have to make a huge, long project out of every page makes me realize that as long as I just keep at it, eventually all those photos will get scrapbooked after all!

Thanks for stopping by today. I hope you have a great week!

Friday, July 29, 2011

Scrapbooking Again!

Finally... I found a little time to get started on my huge project: To actually begin making pages of all the tons and tons of photos I have put aside to scrapbook! I can not tell you how long I have been promising myself I was going to start. And now, I actually have!

I made two scrapbook pages. For the first one, I used a picture I took (nearly 2 years ago) of my two daughters at Ruby's diner in Laguna Beach. We had just been at the beach for some picture taking and decided to grab a bite to eat. Since we also have two sons (and a son in law), it was kind of fun for me and my husband to have a little time just with the girls!


This page was so quick and simple to make! The paper is from a page kit by K&Company. There is stitching right on the paper! I love the stitched look, but since I am not too great with a needle and thread, I grabbed these wonderful papers when I saw them in Michael's on a clearance table. And now after using them, I am really glad I got them. All I had to do was add a few embellishments and the page was done!


I wanted to add something super girly and with a bit more dimension, so this gorgeous Prima flower seemed to be the perfect choice. I have such a love for fabric flowers that my baskets are overflowing with them. It was so fun rummaging through them to find just the right one.


The butterfly above is also from K&Company. It's from their Grand Adhesions collection. It came on a sheet of several butterflies and bees. I also added one on the bottom left of the page, and a bee on the flowers at the top left as well. They are very puffy dimensional stickers and look really great with the colors of the scrapbook paper.

So there you have it: a fast, easy start to what I hope will be many completed scrapbook pages to come- in the not too distant future. I am determined to get some books made, even if it means doing lots of simple and quick pages.

I'll be adding my other page soon :-) Thanks so much for visiting!

Wednesday, June 29, 2011

What's In The Box? and Back In The Saddle!


In my last post, I promised to show you a card. And I do have one for you. But first, I'd like to share with you one of the craziest packing jobs I have ever encountered!


I had ordered some things off Amazon, which I love. I have found all sorts of things there. Including these great little anti tarnishing strips for silver. I don't know what it is, but ever since moving to California, my silver tarnishes so much faster than it did back East. So, in an effort to to try to prevent it from being quite so bad, I decided to try these strips. They come in a very small, thin little pack as you can see in the photos below.


So why in the world, when we are all supposed to be environment conscience and "echo- friendly" would a company ship that little package in this packaging?!


Can you believe that?! Heck, when the package came addressed to me I was totally perplexed as to what could possibly be inside. I had not remembered ordering anything that I would have thought could be in that tall box! You can imagine my surprise when I opened it and found the little package of strips! I still can't get over it. I have to ask you: have you ever had a company package anything so ridiculously? And, why do you think they would do that? Is there any way this makes sense?


Okay well, I just wanted to share that with you as my strange situation for the day ;-)


So... as promised, my card.

Now- a word of warning. I am not all that happy with it. Having said that, I am happy about it.

Let me explain:

For those of you who may not know, I am an avid card maker/ stamper. I am, well, for lack of a better way to say it- addicted to stamping. I love it! It's my passion, my therapy, all those things stampers say about stamping... it's my hobby and then some!

But for the past several months I have not been stamping due to having a great deal of pain in both of my hands and one of my elbows due to nerve damage and arthritis. I have been going through months of physical/ occupational therapy and finally I am starting to get back to stamping again. At least I am giving it a shot!


So, as I said- I am not really happy with this card. It is pretty obvious that I have been "out of the loop" for some time. But- there were many days I was in fear that I might never be able to stamp at all again! So, considering that, I am super grateful that I am able to get back to it at all! Therefore, as I am sharing this card with you I just ask that before you comment, please keep in mind that this was a rather difficult card for me to make. I am not big on making excuses for myself; I just want you to know my reasoning behind how I feel about it and ask that you be "gentle" in your critiquing of it. I appreciate your comments as always, but am hoping you'll bear with me and my situation. I am hopeful that before long, I will be stamping with ease. Or at least less and less difficulty as time goes on! :-)


Here you can see a bit better the texture created by the Sizzix plate. It's subtle, but certainly adds well to the feel of the card. And the print of the designer paper is so soft and pretty. I love these blues with the faint yellows together.

Little things like using dimensional adhesive dots easily gives a little pop to a card. And one single pearl for the bird's eye can really add interest. And finally, I used my "Bow Easy". And yes, it actually did make my bow easy ;-)


Thanks so much for stopping by. As always, I'd love to hear from you!


Next time I hope- no- I plan to have another card for you, showing much progress. Now how's that for positive thinking? ;-)


Items I used to make this card:

Stampin' Up! Designer paper: Bella Birds

Stampin' Up! card stock: BrocadeBlue; Bordering Blue; Ballet Blue; Very Vanilla; Always Artichoke; Old Olive; Chocolate Chip; Basic Black

Stampin' Up! Daffodil Delight satin ribbon, 5/8" width

Stampin' Up! punch: Word Window, large

Sizzix Bigz die: Bird With Leaves & Flower

Sizzix Elegant Designs embossing plate

Spellbinder's Shapeabilities Pendants die: Fair Isle

Bow Easy

Small adhesive pearl

Sunday, June 26, 2011

Something Old, Something New

Well, new to us, anyway! We went on another antiquing excursion, my husband and I. With camera in hand I walked around some of our favorite antique shops- including one that I have shown you before, but the owners added more space since we were last there. And, we found they did some really cool things outside in the back, as well. If you love antiques, I think you'll enjoy this little tour!


I am always so impressed by what a wonderful job so many sellers do with their display areas. Often they have a very small amount of space with which to work, but somehow they manage to make it all look so great. Although almost a "visual overload", it actually makes the hunt more fun! Isn't this "room" above pretty?


There are so many feminine things here in this "shabby chic" area. The pretty quilts, the chandeliers, the vine of flowers, bird cage, white furniture..


Even the stuff that to me looks like "junk" somehow works in here! And how about that huge clock and some of the crazy shoes?


I just love the old clothes!


There were some really sweet items there. Don't you just love the little white wicker children's rockers?

Then we went outside....

Is this great or what? I can not get over how cool this area out back was! They really did an awesome job out here. So creative!


Haha! Even all these old junky appliances looked just wonderful!


These bird houses are all so pretty. The man who makes them also sells them at our friend's house when she has boutiques for charity benefits. ( I did a post about the boutiques HERE.) He also makes awesome jewelry and key rings out of antique silverware. I have bought some of the prettiest earrings from him, and I love my key ring, but I think his talent is really in his painted birdhouses. We have three of them hanging in our back yard now. One has a new little bird family in it and one of them also serves as a wind chime, as he hung some antique spoons from it- so clever! And I am just waiting for the empty one to welcome "tenants"! We also have one more we still need to hang. They are all just so cute.

We had such a great time just walking all around the area of shops- and didn't even come close to getting to all the ones on our list to see. But we did manage to find a few things we felt would be nice additions to our home. One thing I saw, Mike actually went back and bought a few days later and brought it home to surprise me:

It is this wonderful old antique musical instrument case. I just thought it was so cool. It sits on our piano, and will serve to protect our daughter's violin.

I think it works well near my husband's antique radio. And our piano is pretty neat, too. You can play it as a "regular" piano. And the dogs both love it when I do! Notice I said the dogs as I am not exactly what you'd call a fine musician, lol! But it is also a player piano that you can either play manually by pumping the pedals with your feet to make the rolls turn, or it can be plugged in and switched on to play electronically. It's really a fun instrument!

And this was Mike's early Father's Day gift from me. I wanted to surprise him with it but I needed him to pick it up, lol, so I had no choice but to tell him about it ahead of time. I had called the store after we left because he liked it so much. They were really great and even came down in price on it and held it until Mike could pick it up. (And that's when he got me the instrument case.)

We really weren't sure we had the "right" spot for this beautiful deer in our house, but he actually looks awesome right over the door of the dining room as you enter the kitchen.

It's really quite large, but with the high ceiling, it fits perfectly there.

And here is something I have been wanting since I saw one about a year ago and have been kicking myself ever since for not buying it. It's an authentic old Hollywood movie light! There is a man who was able to buy some of the old lights and he refurbished them and wired them so you can plug them in and use them as lights in a room. The one I had seen last year was so great that I took a picture of it and had been thinking of it ever since. We went back but it had sold. But when we recently went in again I decided to ask the store owner if he knew if there might ever be any more available. He called the man who had it and was told he had just one large one left (he had some smaller ones that fit on tables at one time, too). So, the guy got it all worked on and a couple of weeks later brought it in for us. They emailed me pictures of it and I knew I just couldn't pass it up. Actually I was told after I bought it that had I decided not to get it there was someone who worked in the store that wanted it. Apparently everyone who saw it just loved it. Well, I am thrilled with it. What do you think? I figured that with all the New England antiques we had, it was time to add a little bit of Hollywood history to our Southern California home. Isn't it cool?

I have the light in the living room area and I think it is great there. Actually, our living room and dining room, although somewhat divided, are really just one big room together.

Here you can see the Hollywood light and the deer together. I think we found a couple of really great additions for our "eclectic" style of decorating. What do you think?


Thanks for stopping by! Next time I will be posting a hand made card- at last, I promise ;-)
After hearing from so many of you how much you enjoy my posts of antiques and collectibles, I figured this would be a good thing to share from time to time while I am not able to craft as often as I would like. I am still not able to stamp very much, but I am slowly getting back to it. Thanks for your patience with me, and for continuing to stop by. Please leave a comment; I love hearing from you all!

Wednesday, June 22, 2011

Birthday Fun at THE TALK!

Wow! It's been far too long since I have posted, so I decided I'd start off by sharing some of the fun things that have happened over the past few months.

First of all, I had another birthday. And this year I decided to ask my husband if he would take me somewhere really different. Somewhere I have really, really been wanting to go:
To be in the audience of a taping for the t.v. show "THE TALK"!

I don't know that he was all that enthusiastic about the idea, but he knew it was what I wanted and he was anxious to make my wish come true. (He's such a good sport!) :-)

So, Mike took the day off from work and here we are- actually going out somewhere during a weekday while the kids were in school. That doesn't happen too often!


We had to pick up our friends Sue and Ron really early and get on the road in good season, since it was a Monday morning. And, given that we were headed up to Los Angeles, well... that could mean some serious traffic possibilities!

But, thankfully we made great timing with no delays. The closer we got, the more excited I became!


Hello L.A.- covered in typical early morning haze!!!


Approaching the CBS studios!


In line in the CBS garage - here is my dear friend Sue, her husband Ron, and my wonderful husband Mike.

While we were in the elevator- packed full of people, Mike just had to tell everyone that it was my birthday- and got them all singing "Happy Birthday" to me. That was one loooong elevator ride!


Haha! We were actually shown several times during the show. It is broadcast live for the East Coast, and shown recored here on the West Coast. Of course, we taped it so we could watch it when we got home.


It was more fun than I can even tell you! I love the hosts: Julie Chen was my favorite from the beginning, but now that I have seen it (basically every day since it started) I love them all. Sharon Osborne is absolutely hilarious! Leah is super funny, too and Sara and Holly really round out the group. I think they all provide a wonderful mix of personalities and work really well together. I always look forward to that hour break in my day with them.


The guests included the band HEART (they were fantastic!) and they performed a couple of their songs. Everyone in the audience was given a copy of their music dvd, too. And, to top it off, we all got $100.00 spa gift certificates, as well. Happy Birthday to me! :-)

Well, sooner than I would have wanted, it was time to head back home. But before I was even out the door of the studio I was planning in my head my next trip up here!


Goodbye L.A.! Until we meet again!

We then went to lunch at one of my favorite restaurants. It was the perfect ending to a wonderfully happy day!

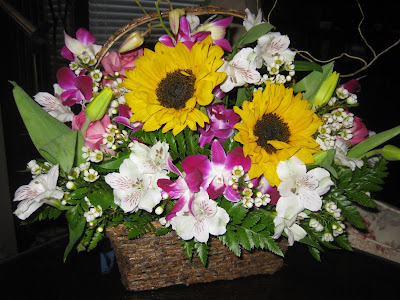
But my birthday surprises were not over, as I was greeted at home with this absolutely gorgeous arrangement of flowers sent to me by my precious East Coast friend Maryann.
She is an amazing friend whom I miss dearly, and she never misses my birthday.


So there you have it: one of the many ways I have been occupying my time while I have been unable to stamp. My hand therapy has gone well, though and I am happy to report that I am (slowly) getting back into my studio and creating again. I have only made a couple of cards over the months, which I will soon be sharing. But I have lots of other things to share with you as well.

I've missed blogging and plan to make up for these months away as best I can. So... thanks so much for your patience while I was gone and please leave a comment if you'd like. I've missed hearing from you! :-)

Until my next post.... I hope you are having a wonderful start to Summer!

Saturday, April 9, 2011

The Butterfly Effect

Well, I am at it again. Stealing ideas and designs from my friend Maureen ;-)

You may have seen my post a couple of weeks ago with her cute cupcake cards. I have once again totally taken Maureen's idea and just made a few changes to make my version of her adorable card.

Here is Maureen's butterfly card that she did for her latest Stampin' Up! club workshop:


I love the Crumb Cake (formerly known as "Kraft") card stock for the base of the card. She just stamped a few images from the Stampin' Up! Flight Of The Butterfly stamp set, and then punched them out using the hand held butterfly punch. She added some rhinestones for bling, and a pretty ribbon to the side.


Inside the card, she stamped the swirly sentiment "If nothing ever changed, there would be no butterflies", also from the same stamp set.
Super cute, huh?

So... now it's time for my version:


I am still having a lot of trouble with my hands, but thankfully my diligence in doing my exercises and going to occupational therapy does seem to be paying off. But I must continue to take it easy and not overdo things. Stamping, sad to say, is not on the list of things I should be doing a lot of these days. So, when I made this card, I omitted stamping the butterflies. Instead, I chose some really pretty PTI papers that my sweet friend Debbi sent me. They are from the Everyday Blessings collection. I love them! (Thanks, Debbi!) :-)


I just punched out 3 butterflies and put them down with a glue dot on the center. I kind of pulled the wings out a tiny bit, and then added flower shaped rhinestones to them. I think I got those from the dollar bin at Target quite some time ago. They were perfect!


I added some PTI swiss dot ribbon in Spring Moss satin. Then, I glued another butterfly down inside the card. I decided to leave it blank so I could use the card for any occasion: Hello; Get Well; Birthday; Thinking of You; Shower... etc.


It was so easy and quick to make, that I ended up making several. It's great to have cards on hand for when you need them in a pinch. This is definitely a great design for making a whole bunch at a time.

Once again Maureen has come up with a wonderful card. And I can't thank her enough for letting me share it with you- as well as allowing me to grab her idea and run with it!

Thanks for stopping by today. I'll try to do something more "original" as soon as my hands are up for it!

Have a great day, and please leave a comment if you'd like. It's always so great to hear from you!