Tuesday, December 27, 2011

Perfect Sentiments Challenge: Thank You!

It's time for another fun challenge from The Perfect Sentiment!
This week the challenge is to make a card with a "Thank You" sentiment.
The twist is to use this sketch for inspiration:


I love this layout and really enjoyed using it for my card.
Here is what I came up with:


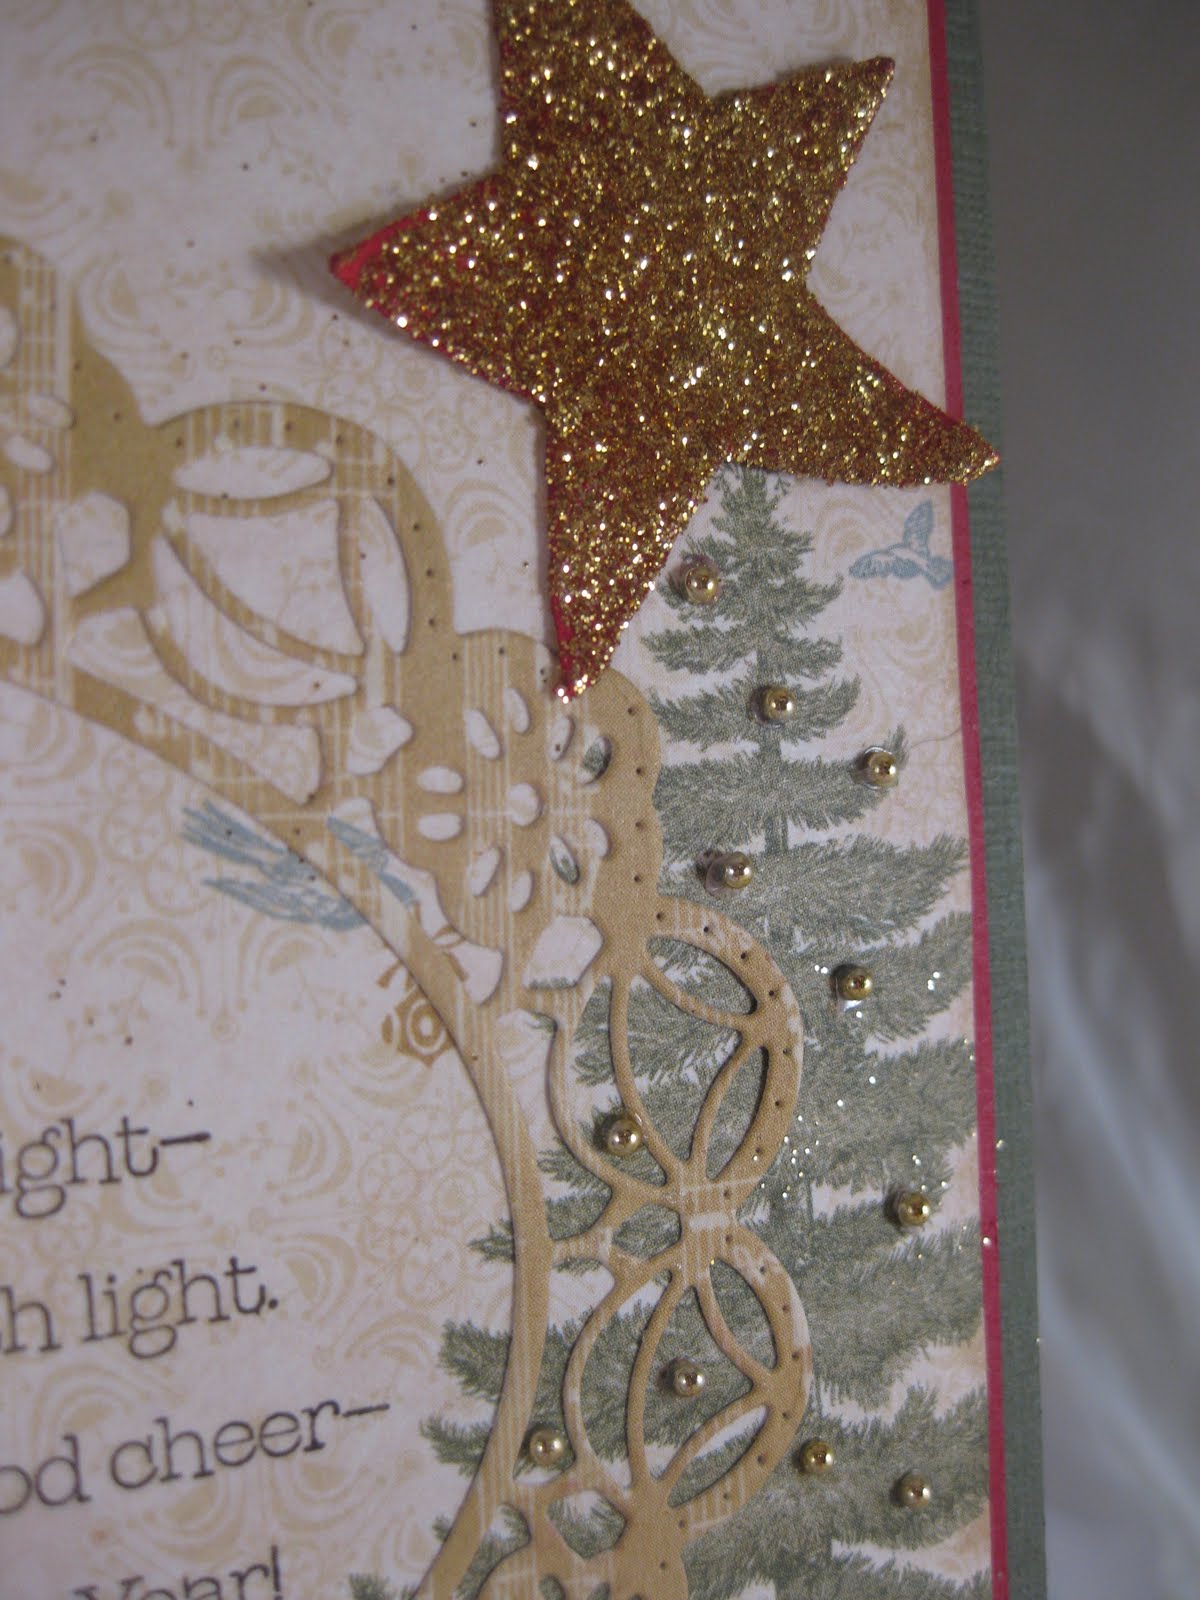
As you can see, I stuck really close to the sketch's layout. It is such a great design that I really didn't want to change it at all.


I colored my bird using Stampin' Up!'s Watercolor Wonder crayons and a wet paintbrush.

I used crocheted lace for my side border.


To give a little more color and a "shadow" effect, I cut my label twice and layered them- the vanilla over the red- and stamped my words in black ink.


I chose these wonderful Stampin' Up! vintage flower adornments in the blue and red which match the papers really well. I love how they look on here!


And there you have it.
You have until Tuesday at 10:00PM EST to link up your card over at The Perfect Sentiment.
This week our sponsor is Pattie's Creations Digital Stamps and the prize will be one free digital stamp image.


I hope this has helped inspire you to make your own thank you card to link up and share.
For even more inspiration, please check out all the cards from the other Design Team members from The Perfect Sentiment:
and our Guest Designers:

Thanks so much for stopping by and checking out this week's challenge from The Perfect Sentiment. As always, your comments make my day. I'd love to hear what you think! :-)

Included among the items used to make this card are:
Stampin' Up! card stock: Very Vanilla; Cherry Cobbler
Patterned paper by Kaiserkraft
Spellbinder's Fancy Tags die
Stampin' Up! Vintage Flower Adornments
Sentiment Stamp: Stampin' Up! Short & Sweet stamp set
Bird Image stamp: Stampin' Up! Touch Of Nature stamp set
Ink: Brown StazOn for bird image; Jet Black Archival ink for sentiment
Stampin' Up! Watercolor Wonder crayons


Monday, December 26, 2011

Final Christmas Card For 2011

It's the day after Christmas, but that's not to say Christmas is over. There are after all, twelve days of Christmas. So.... I have one last card to share with you for 2011.

(Note: this card was also featured on the Classy Cards 'N Such blog, with more info about the products I used.)

I used Christmas paper from Webster's pages, which I just love!

The flourish was made using a Cheery Lynn die. It cuts out so easily; such a beautiful embellishment. The pretty lace trim is from Classy Cards 'N Such (as is the paper and the die) and is one of my favorites to use when I need something very delicate and narrow. And at only 50 cents a yard, it's an awesome buy! :-)

For my sentiment, I stamped it in black onto a Spellbinder's 14 labels die, sponged around the edges, and for the accent I used the coordinating Want To Scrap rhinestones.

I added some tiny little Want To Scrap red baby pearls for berries onto my holly flourish, and then glittered some of the leaves so it looks as if they are dusted with snow. I really like how it turned out.

Most everything I used is available at Classy Cards 'N Such. (Click on the product names mentioned above; I have linked them to the store for you.) And remember- all you have to do is put in the code SARAH-10 and you will save 10% off your order!

So that's my final Christmas card for this year. My Christmas tree was so dry and droopy that ornaments were falling off and breaking. Today Bert from Sesame Street came crashing down and lost a leg. My eldest son had that ornament since he was a little boy- probably about 20 years ago. He is so bummed. I think I can glue it and maybe put a little paint on it and it will be "okay", but that was the last straw. I think we ended up having about 10 ornaments break this year because of that darn tree (it's a long story, but this was surely the worst tree we have ever had!). At any rate, it is now outside on the curb. I will, however, leave the remaining decorations up until Epiphany :-)

I hope you had a wonderful, blessed Christmas day. And, to quote the sentiment on my card:
I wish you a never ending season of love and peace.
Thanks for stopping by!

Tuesday, December 13, 2011

The Perfect Sentiment: Anniversary Challenge!

It's time for another wonderful challenge from The Perfect Sentiment!
This week the sentiment is for an anniversary card. And the "twist" is for you to make a card inspired by this gorgeous photo:

I just loved that picture and immediately had all sorts of ideas running though my head. But, in the end I came up with a rather simple card- but a romantic one that was inspired by several elements in the photo.

The only thing I did that you can't really see (since I photographed it using a black background) is that I started with a black base. If you look at the top left where the tulle is wrapped around you can tell. Anyway, that little frame of black was inspired by the black shutters in the picture. And from there I just grabbed some of the awesome romantic and feminine looking features of the photo.

Since there was the scroll work in the wood of the porch (in the upper right corner of the pic) I chose this pretty rhinestone swirl for my upper right corner. And to represent the swirls in the chairs, I used background paper (which kind of shimmers in the light) with some swirls as well, and the swirly elements in the border of my doily. I used pretty light blue card stock for another bordering layer as well as to frame the fan. That was inspired by the vase as well as the almost blue hue from the reflection of the porch floor.

It's only one little flower to represent the lovely flowers in the photograph, but I thought the little bit of color in this pretty flower was just the right amount. And the tulle wrapped along the side of the card was clearly inspired by the wispy flowing tulle looking material hanging in the picture.

Stamped in black are the simple words Happy Anniversary in a scrolly font.

And there you have my take on this week's challenge!
I loved making this card and hope I have somehow inspired you to make a romantic anniversary card as well. Thanks to our wonderful sponsor this week, we have a great prize to offer: A $9 gift voucher equivalent to three digital images from Shelly's Images!
Now before you get busy making your card, be sure to stop by all of the Perfect Sentiment design team member's blogs for more inspiration!

and our Guest DT members:

Thanks so much for visiting me today. I hope you have been inspired to create your own card to submit for our challenge this week! You have until 10:00pm EST Tuesday to get your card in. Check out all the details at The Perfect Sentiment.

Items used to make this card include:
Stampin' Up card stock: Basic Black and Bliss Blue
Patterned Paper: Stampin' Up! Specialty Bride
Doily and paper cut using the Sizzix Ornate Fan die
Ribbons Stampin' Up! light pink grosgrain
Rhinestone swirl by ZVA Creative


O Christmas Tree!

I am back with another Christmas card I have made for the Classy Cards 'n Such blog.
This week I had so much fun making my card- and used some really awesome products I'd love to stare with you.
This is a pretty easy card- I basically just "fancied up" a beautiful piece of patterned paper from the Webster's Pages "Waiting For Santa" collection.
After I stamped my large sentiment pretty much in the center, I just worked all around it. The paper made it so fun and so easy!

As I explain to you how easily this card came together- I will link some of the awesome products I used from the Classy Cards 'n Such on-line store. That way you can check them out for yourself. Remember: use the code Sarah-10 to receive 10% of your order! Also, Beverly has some awesome specials going on right now, so be sure to check those out too!

As you can see, this paper is so, so pretty- so vintage-y and with such wonderful colors!
I put a Prima glittered start on top of the tree and some little gold pearls I found in my stash for the ornaments. But you could use any little pearls (like the awesome tiny red ones HERE).

And check out this frame! I absolutely love the Polynesian Sails oval die I used to make it!
I die cut it using another pattern from the Waiting For Santa paper. Isn't it great? This die is so detailed and cuts beautifully. And, it even has another shape that cuts at the same time- it's like getting a bonus cut :-) Anyway, this die is absolutely one of my favorite new dies; I am sure I'll be using this one a lot!

You can also see I adhered a little silver finding I had in my stash. This paper is so great for just dressing it up with miscellaneous things you have. Like trimming a Christmas tree- there are endless possibilities to what you can put on there :-)

My flowers are some Primas I had that were a good matching color (although with this paper, I think many different shades of red and pick work well). I added some extra sparkle to them with some fine gold glitter and some more little gold pearls.

I made my bow with some seam binding which I had dyed myself using Tattered Angels Glimmer Mist. But I could never have tied it the way I did without the use of my Bow Easy tool! I am loving this thing! I actually triple bowed it and am crazy about the way it turned out. I adhered it using Scor-Tape, as I did with the glittered star. That star just didn't want to stick until I used this awesome tape. I just can not get enough of it. Definitely one of my faves!!

For my final touch, I put some larger red pearls on the corners of the card.
And that was it! This was really a lot of fun making a pretty Christmas card for someone special.

I hope you are enjoying this special time of year and managing to take time out to remember what our holidays are all about. I know I am as guilty as anyone as far as getting caught up in the rush of the season. But I am also trying harder this year to stop and soak up some of the wonder! I am also making a point of being sure to spend as much time with my family and loved ones as possible. The weeks fly by so quickly and suddenly the holidays will be over. Then we are just left with the memories. I am trying to gather as many precious ones as I can, and hope you will do the same!

Thanks so much for taking time out to visit me today. I am wishing you many Christmas blessings!

Tuesday, December 6, 2011

The Perfect Sentiment: A Sparkly Christmas!

I am so excited about the challenge we have for you this week at The Perfect Sentiment!
It is to make a card that reflects a sentiment for Christmas. The twist is to make it sparkle!
The card I made is also my card for this week at Classy Cards 'n Such.

I had been decorating my house for Christmas last week. On my Christmas tree my favorite ornaments are the ones I have had for many years, as they represent so many wonderful memories. Among them are several from my childhood and even quite a few that had belonged to my maternal Grandmother- some over 100 years old. (You can see them here in "Decking The Halls" and here a little closer up in "More Christmas Decorations" from a couple of my Christmas posts I did last year.)
I love antique and vintage ornaments , so when thinking of the card to make, I decided to create something with a vintage look to it. And, since I love sparkle and glitter so much, I added that element as well, and realized it would be great for this week's challenge, too!

I started with a base of Stampin' Up!'s Early Espresso card stock, followed by a layer of Christmassy red (Stampin' Up!'s Cherry Cobbler) over it. Then, I die cut Stampin Up!'s Deck The Halls patterned paper using the awesome Dainty Dutch Deco frame from Cheery Lynn Designs. The detail in this die is incredible!
In the center of the frame I put my sparkly vintage ornament. It was die cut using silver glitter card stock and one of the Nestabilities 2010 Heirloom Ornament dies.

Then I added a few leaves and layers of flowers from Prima's glittered floral embellishments. But the problem is, this thick glittery paper is difficult to adhere things to. So let me introduce you now to my new best friend: Scor Tape! I had never used it before, despite having been told by several of my crafty friends how great it is. Well I just have to say, this stuff is awesome! I had been using red backed tape for years. But it can be pretty pricey and I had run out. So, I figured I'd try this. I am so glad I got a roll of each of the three available sizes because I love it! It holds great and I think it's easier to use, as the backing comes off more easily and doesn't stick to you the way that static-y red backing can, lol. And I found I got a lot more of it for a lower price- only $5.00 for 27 yards! If you've never tried it, I urge you to give it a shot. I sure wish I hadn't waited so long to get some!

In the center of the flower I put a few tiny red rhinestones.

At the top of the ornament I made a bow out of one of my favorite embellishments: the Ecru Delight lace. I find it goes so well with so many things and is so easy to tie and work with. And priced at only .50 cents per yard, you just can't beat it! :-) I tied my little tag (made using Stampin' Up!'s Tiny Tag set and punch, with Artichoke card stock) into the lace using ivory colored sewing thread.

I added a stamped label which I made using Stampin' Up's Winter Post stamp set and colored with Artichoike, Cherry Cobbler and Espresso markers down in the bottom corner. Then for a little more elegance I put some beautiful Want 2 Scrap red pearls in the upper left corner.

The ornament on my card may not look exactly like my cherished grandmother's ornaments, but I love the vintage feel of my card- with all that wonderful sparkle to top it off!
I hope this has inspired you to make a sparkly Christmas card, too.

Our sponsor this week is Kania's A*Muse Studio, who is offering a wonderful prize of a $15.00 gift certificate! (U.S. participants only, please. If our willer is from outside the U.S., digital images will be sent.)
You can visit Kania's A*Muse Studios at https://www.amusestudio.com/jskania

Be sure to check out all the blogs from The Perfect Sentiment design team:
And our newest guest designers for December:

After you have soaked up all that inspiration I hope you will create your own wonderful, sparkly Christmas card and share it with us at The Perfect Sentiment! You have until 10:00PM EST Tuesday to get your card linked.


I am also linking this card to these challenges: I Brake For Vintage IBFCC15, over at I Brake For Challenges; The Artistic Stamper, for their Christmas challenge; Colour Create for challenge 85- Red, White and Green; Papertake Weekly Challenge Blog: Anything Goes; and Crafty Catz Challenge 111: The Colours of Christmas With The Option Of Sparkle.
Thank so much for visiting my blog today.
I'd love it if you'd take a moment to leave me a comment and let me know what you think!
Wishing you Christmas Blessings,
Sarah


Tuesday, November 29, 2011

The Perfect Sentiment: Anything Goes!

I am back to invite you to join in on another fun challenge over at The Perfect Sentiment!
This time it's "Anything Goes", but you must CASE- as that is our "twist" this week:-)
Our challenge this week is being sponsored by The Digital Emporium, and our winner will receive their choice of 3 digital images! You have until next Tuesday at 100:00PM EST to get your card in and have a chance at winning this week's prize.

I would love it if you'd CASE my card of course, and I will tell you it really was a fun one to make. I do think there could be endless possibilities here; I am actually considering CASEing myself, lol! I loved making this card for many reasons:

For starters, I used a lot of my faves on it. I really like browns. And with some cream added, and a few touches of SU!'s beautiful Baja Breeze blue, this is one of my favorite color combos.

Another fave of mine: toile. I love anything toile. This was my first time using the Elements of Style stamp set, and boy is this one beautiful set of stamps! The flowers are so pretty. I considered watercoloring them but ultimately decided to just stamp them in Sahara Sand ink onto white card stock and to give them some "pop" I cut them out. I also used the same floral stamp all around the edges of my card base.

The bird and butterflies were punched out, and I adhered the bird using dimensionals. A little pearl was added for the bird's eye.

I think the kraft colored ribbon matched really well and added a little softness to all the darker shades of brown. I also put some little pearls on the butterflies, too.
The textured patterned paper is awesome and adds a wonderful feel to the card.

And don't you just love this frame? It was actually made by my friend Lidia who has a wonderful Etsy shop called Breaking Barriers. You can check out her beautiful work and lovely items for sale HERE.

Well.... have I inspired you? I sure hope so! I would love to have you CASE me- or any one of my fellow design team members at The Perfect Sentiment. Be sure to visit their blogs to see all of their wonderful "Anything Goes" cards here:
Thanks so much for joining me again for another challenge from The Perfect Sentiment!

Items used to make this card include:
SU! Sahara Sand, Chocolate Chip and Baja Breeze Card stock; PTI white card stock; SU! Parisian Breeze patterned paper
Stamps: SU! Elements of Style; Punch Potpourri; Blessings From Heaven
Ink: SU! Sahara Sand; Baja Breeze; Early Espresso
Accessories: Martha Stewart butterfly punch; SU! Bird punch; Adhesive pearls; SU! Kraft Taffeta ribbon; hand made polymer clay frame

Tuesday, November 22, 2011

Perfect Sentiment Challenge: Encouragement!

Encouragement. How often could you think of someone that could use an encouraging word? Well I think it's a wonderful reason to send someone a card. Sometimes something as simple as finding a little note in the mailbox with an encouraging message is all it takes to really brighten someone's day and provide just what is needed when things get to be a bit "too much".

So this week our challenge for you over at The Perfect Sentiment is to make a card with an encouraging sentiment on it. And for the "twist" to our challenge: Use the provided sketch to inspire you!


Our prize this week will be for a free digi image from our wonderful sponsor Pattie's Creations!


I had fun with this sketch, but didn't have to think too hard on what I was going to use. As soon as I saw the inspiration sketch, I just knew I would use a doily. However... it wasn't until I remembered my new Cheery Lynn Design's die that I considered making my own doily :-)

And for me, lace is always one of my favorite embellishments anyway, so with the lacy doily, I decided this pretty crocheted lace trim would be perfect. I love the color!


I also like stripes and flowers together, so I picked these pretty papers from Stampin' Up!. The light pink flowers on the paper I used for the doily are very subtle and faint, but if you look closely I think you can see them ;-)

I added 3 flowers to the top right corner to represent the three little things on the sketch.


And I put my encouraging sentiment within the circle. I used Stickles to add a little touch of glittery bling to my card.

And there you have my interpretation of this week's sketch challenge.

For more inspiration, please check out these other cards from our design team:


I hope you will head on over to The Perfect Sentiment for all the details so you can join in the fun and submit your creation this week. Just be sure to submit by Tuesday at 10:00 PM EST, and use the keywords PSC08. I can't wait to see what you come up with!

I'd like to take this time to wish you and all those near and dear to your heart a very happy, healthy and blessed Thanksgiving!


Items used to make this card include:
Card Stock: SU! Very Vanilla, Rich Razzleberry and Pink Pirouette
Patterned Papers: SU! Parisian Summer designer paper
Ink: SU! Rich Razzleberry
Cheery Lynn English Tea Party doily die
SU! Scalloped circle punches and circle punch
Pink Stickles
Webster's Pages crocheted lace trim
Sentiment Stamp from SU! Refuge & Strength stamp set


Sunday, November 20, 2011

Christmas Wreath

With only a few days until Thanksgiving, I thought it would be the perfect time to start sharing Christmas cards with you! This one I made for Classy Cards 'n Such. I used several items from the store which I would love to tell you about.


The main focus, of course, is the "wreath". I made it using Cheery Lynn Design's English Tea Party doily. This die is amazing, as the details are so beautiful and it all cuts out so well!

For the center of the wreath, I used a dimensional floral sticker from K& Company. And around it I put a circle of gold Nestabling rhinestones. These are awesome; all you do is pull up the whole circle and stick it down. No need to try to evenly place rhinestones one by one!

For my sentiment, I used one of the Nestabilities Fancy Tag dies. I stamped onto SU!'s brushed gold card stock and cut it out using a Nestabilities oval die.

You can read more of the details over on the Classy Card's 'n Such blog. And if you place an order at Classy Cards 'n Such, remember to use the code SARAH-10 to receive 10% off your entire order! :-)

I hope you have enjoyed seeing my first Christmas card for this season. I will be sharing more with you in the weeks to come, so please stop by again soon. If you'd be so kind as to leave a comment, I'd really appreciate it. Thanks for visiting me today!

Tuesday, November 15, 2011

Oh, Baby! You've Got Us In Stitches!

It's time for another challenge over at The Perfect Sentiment, and this one will have you in stitches. Literally! :-)

The sentiment: for a baby card. The "twist": Stitching!
You may use any kind of stitching: Hand sewn, machine sewn; faux....
But somewhere on the baby card must be some stitching.
Here is my take on this fun challenge:

You have to look a little closely to see my "stitching". I did it using a gold glitter pen- along the bottom of the punched pink "fence"...

... and all around the oval frame....

... and even zig-zagged, way down at the bottom behind and in between the pink crocheted flowers.

Some day I plan on learning how to do the "real deal", because I love stitching on cards! My sweet friend Cyndy has promised to give me a lesson on the little sewing machine I bought just for this purpose. She'd better have the patience of Job though, as I have no idea what I am doing when it comes to using a sewing machine ;-) But this challenge really has me wanting to learn, so hopefully I will be back before long with a card filled with stitches made with actual thread! Until then, my faux technique will have to suffice.

Now it's time for you to take on the challenge and see what you can come up with for a stitched baby card. All details can be found here on the Perfect Sentiment's blog.
Be sure to enter, because this week our sponsor is: Cindy Coutts Designs. She will be giving away a mini Stampin' Up Set, "Something For Christmas". You can check out Cindy's awesome blog HERE. She's doing a 12 Days Of Christmas series and I'm sure you won't want to miss it! Thanks, Cindy, for sponsoring us this week!!

And for more inspiration, check out all of the DT's blogs to see the wonderful stitched baby cards they have come up with:

Abby
Jessica-Guest Designer
Rita- Guest Designer

Thanks so much for stopping by today. I hope you will leave me a comment and let me know what you think. And I hope you'll play along with us, too! Wishing you many blessings today!

Items used in making this card include~
SU! Textured Regal Rose c/s; SU! Pretty In Pink , Pink Pirouette and Old Olive c/s
Patterned Paper: Stampin' Up! dsp - Springtime Vintage
SU! Old Olive satin ribbon
Spellbinder's oval dies
Martha Stewart punch
Mark Richard's pink pearls
Sakura Gelly Roll glitter pen
SU! Mat Pack and paper piercer (for zig zag stitching on bottom)
Stamps: SU! Puns From The Past (buggy) and Buggies & Booties (sentiment)